Introduction
Tribespot is an app that serves as an alternative to typical G-Suite (google forms, google sheets etc.) based recruitment methods by providing a platform that automates/streamlines the majority of the processes involved.
Examples of services offered by Tribespot that circumvent traditional manual processes include:
- Automatic matching of interviewers to interview times based on availabilities
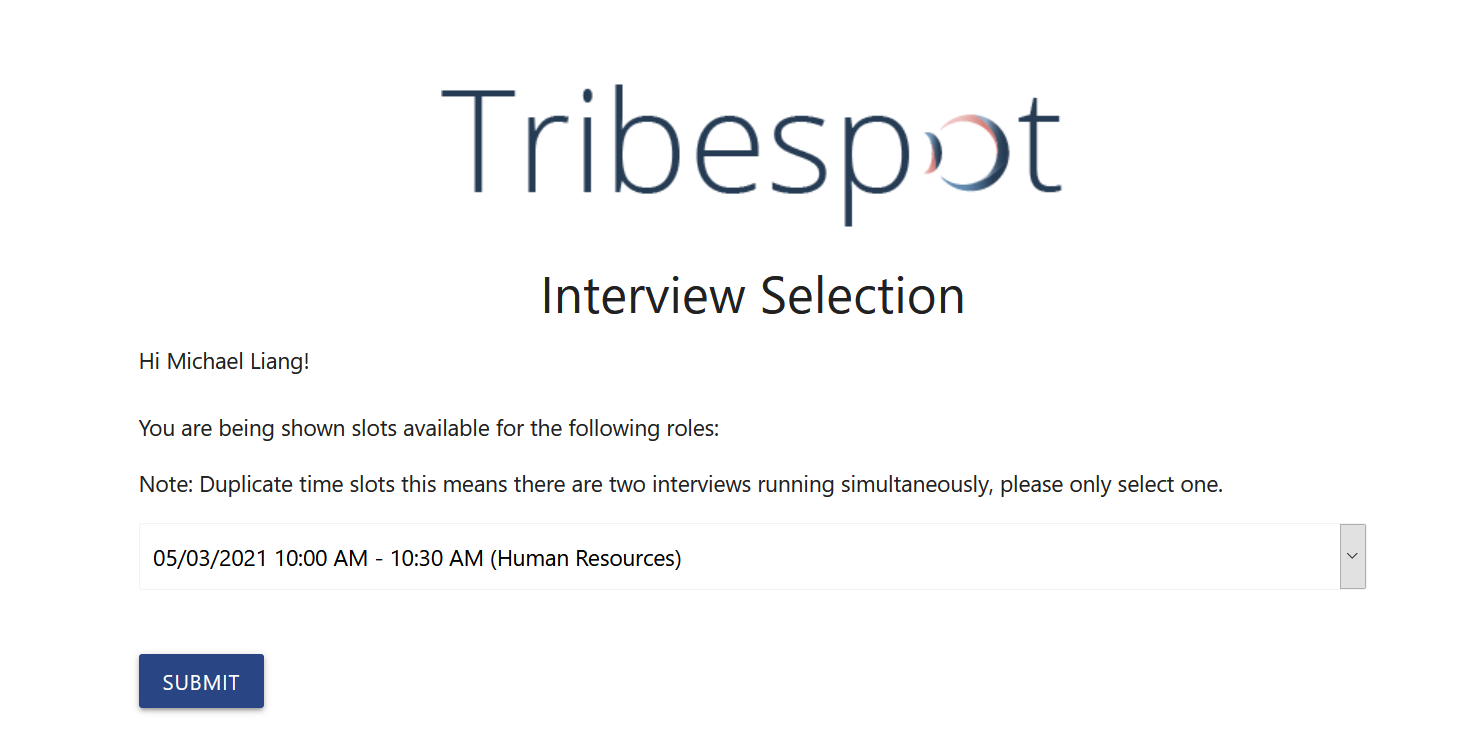
- Interface for candidates choose their desired interview time from a pre-generated list
- Templates to send multiple personalised emails with relevant details (e.g. interview time/date) with one click
- Automated generation of personalised notes/google docs for interviewed candidates
This guide was created in order to faciliate onboarding with Tribespot, as well the familiarisation with its various functionalities. If you have further questions or feedback (including suggestions for missing features that would help your recruitment) about the app please do not hesitate to reach out to us via Facebook or email ([email protected]).
Overview
Below is a rough outline of how recruitment is generally done through Tribespot (these steps correspond to the numbered links in the primary side navigation bar in the app):
- Application form is built and distributed for candidates to apply through
- Applications are marked
- List of interview dates/times is created
- Shortlisted candidates froms step 2 are emailed and asked to pick an interview time from the list in step 3
- List of interviews with allocated candidates is reviewed
- Shortlisted candidates are emailed again to confirm their interview date, time and location
- Candidates whose written applications weren't accepted are emailed to inform them of their rejection
- Interviewed candidates are assessed to be either given the role or rejected
- Successful candidates are emailed
- Unsuccessful candidates are emailed
Please note that not all features of Tribespot are strictly necessary, and some variation to the above procedure does occur in instances such as the "No Interview" drive setting. A more detailed description of each step is given below.
Getting Started - Create a Recruitment Drive
Once you log in, you will be directed to the homepage, where you will be able to view/access the recruitment drives drives you have created, as well as create new ones.
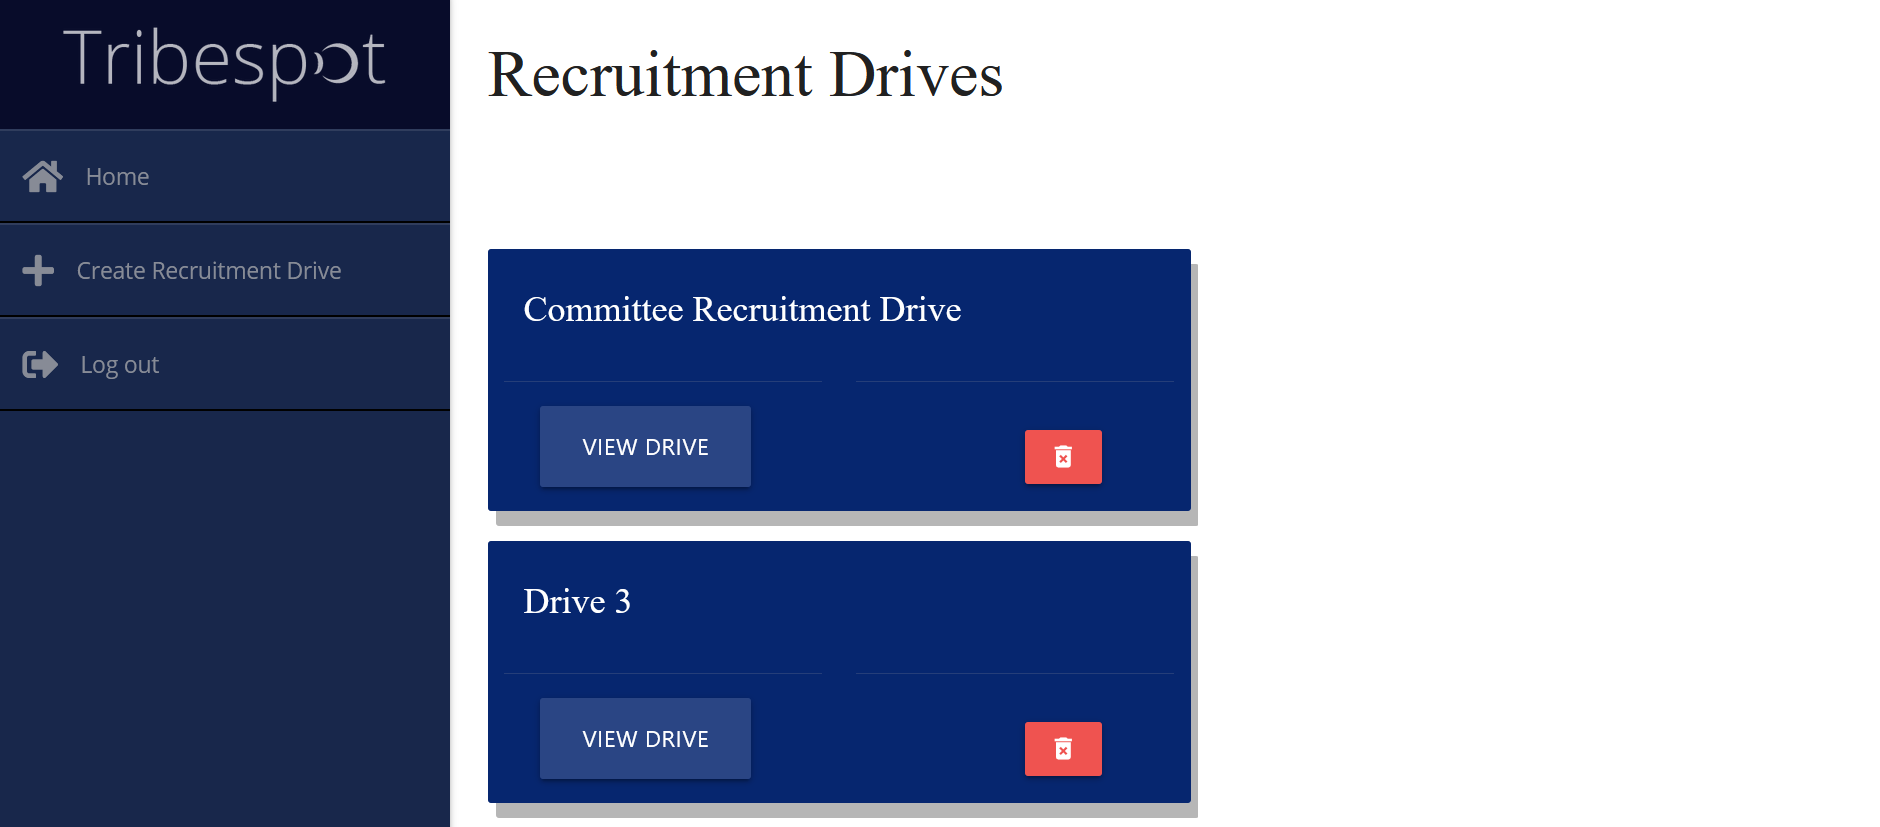
To create a recruitment drive, simply click “Create Recruitment Drive” on the navigation bar on the left hand side. From here, you will be able to name your recruitment drive as well as choose between 4 options regarding how applicants are interviewed:
- Single interview (first preference only) - shortlisted applicants are given one interview for their 1st role preference
- Single interview (first and second preference) - shortlisted applicants are given one interview for their first 2 role preferences
- Multiple interviews - applicants are given one interview for each role they are shortlisted for (maximum of 3)
- No interviews - no interviews are conducted after applications are submitted and candidates are immediately either accepted or rejected
This setting is not set in stone immediately and can be changed before sending out initial shortlist emails in step 4.
Once a drive has been built, it can be accessed in the home page of your respective account along with any other drives that have been previously built.
Step 1 - Build Application Form
As indicated in the side navigation menu, the first step in starting off a recruitment drive on Tribespot is building the application form that candidates will submit their applications through.
The text you enter in the first field will be appended to "app.tribespot.co/form/" to construct the url of your application form. This text will also be used to construct the link that your interviewers can use to enter their availabilities to conduct interviews later in step 3.
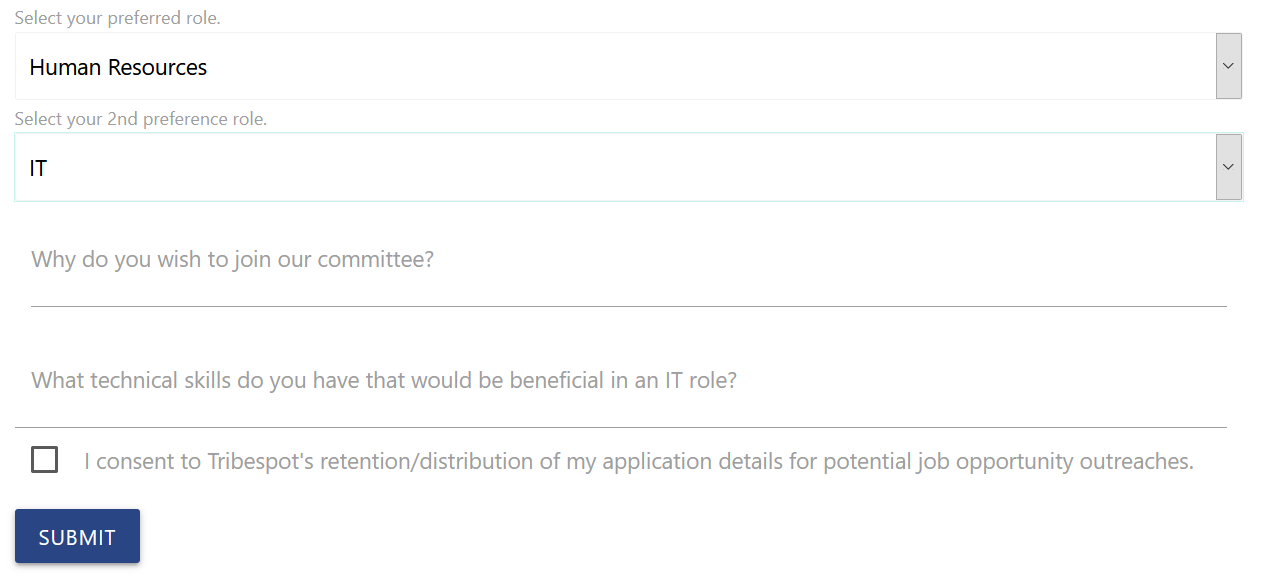
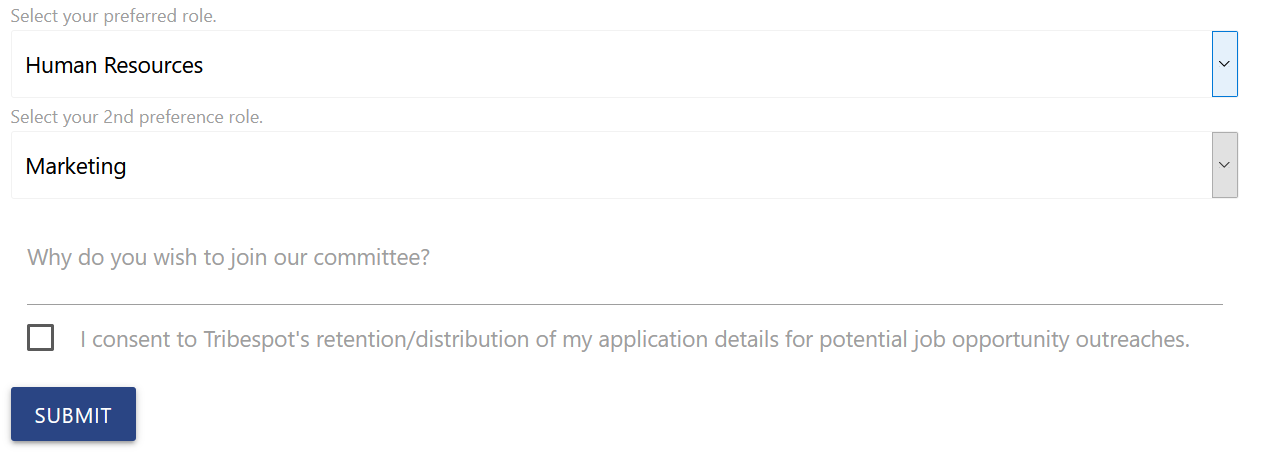
Under the "Roles Available" sub-heading, you are given the choice to have your application form ask for specific role preferences that your candidates must select e.g. If you would like candidates to apply from a choice of events, marketing, education and IT portfolios, enter "events,marketing,education,IT" in the first field, while ensuring the toggle is set to "on". The second input field underneath the "Roles Available" sub-heading pertains to the number of role preferences that your candidates can choose from the list of roles given previously. Please note that you also have the option to set the toggle to "off", in which case your application form will not ask for specific roles. This would be ideal for recruitment drives that are recruiting for a one single position.
Under the "Questions" sub-heading, you are able to choose whether you want to include university-specific and year of study questions in your form. The default application fields your form will contain will be listed beneath the two toggle switches.
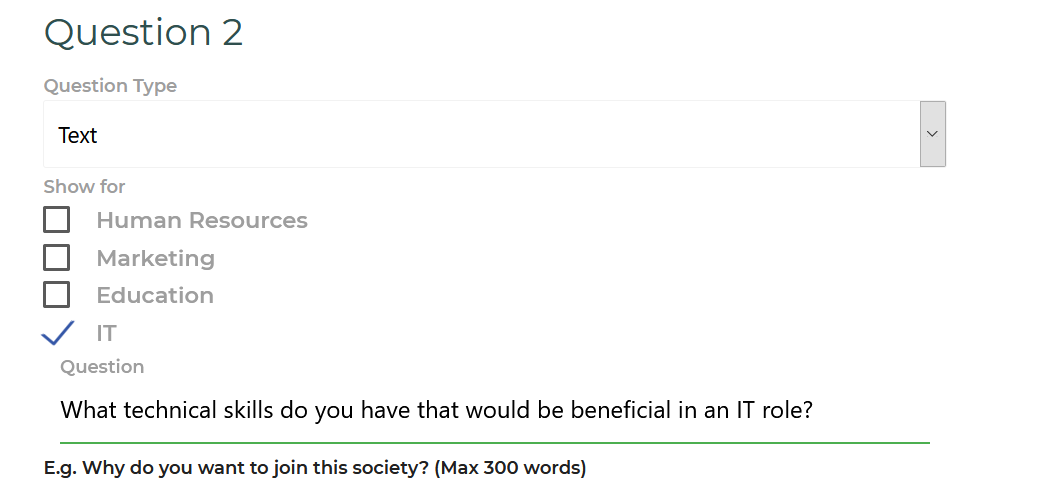
You will then be able to construct custom-made questions for your application form using the interface towards the end of the Questions sub-heading. You will be able to choose a question type from text and checkbox, which dictates how candidates will answer the given question. If you had the toggle for Role Preferences set to on previously, the "Show for" prompt will allow you to control which candidates can see specific questions based on what roles they applied for e.g. if you were recruiting for a events, marketing, education and IT roles, then a common scenario would be to ask "What programming experience/skills do you possess" and only have the checkbox for IT checked - this will ensure only candidates who have selected IT as a role preference will be able to see and answer the question. You can use the green button at the end to add another question, or the red button to remove the most recently constructed question from the form.
You also have the option to accept attachments through forms built with Tribespot. Please note that only one attachment can be accepted, although links to external files (e.g. google drive) can be asked for through text-based questions.
Once you are happy with how you have built your form, click create at the bottom of the page. This will construct your form with the url you specified, and the link will be available for you at the top of the page in step 1 (this link can then be shared as you please). Even after its initial construction, your form can still be edited through the same interface and re-made after clicking create again.
Step 2 - Mark Applications
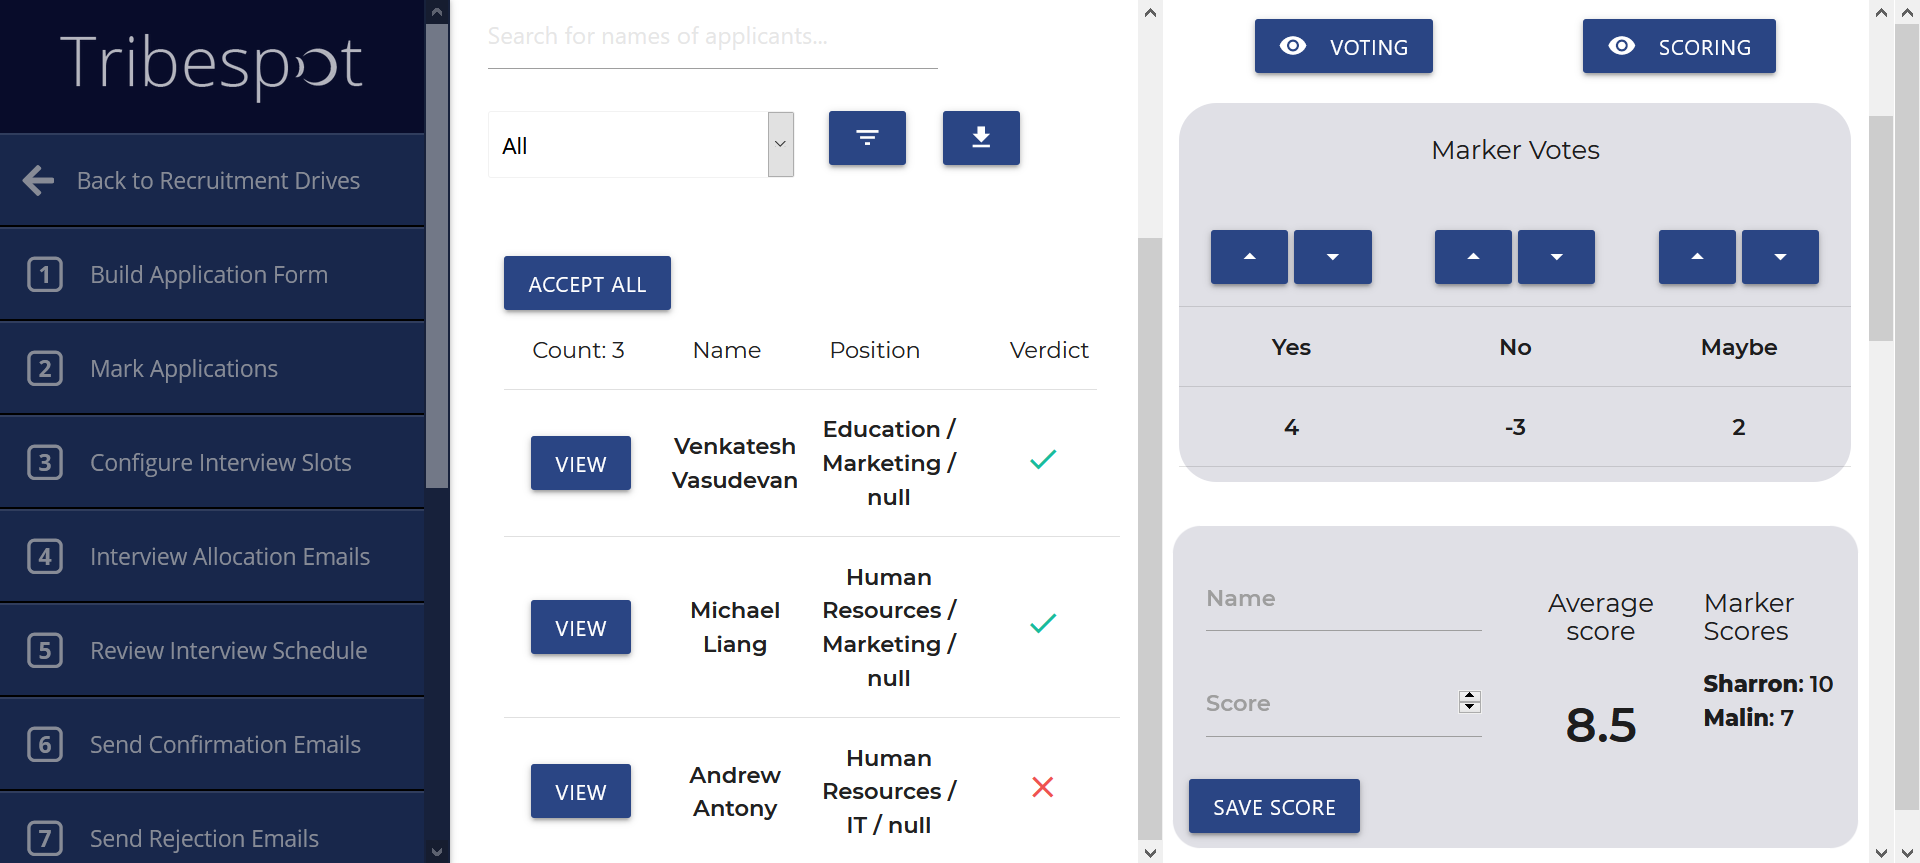
All applications submitted through the form created in the previous step are visible in step 2 for marking purposes. In order to progress each application throughout the recruitment process, only an accept/reject verdict is required - however there are several other features of the marking interface that you may find useful.
Please note that if you require your team to be involved in marking, but do not wish for them to have access to your Tribespot account, an external marking link is provided at the top of the page on the left-hand column. This link will prompt them to enter a password (which is generated by you in drive settings of the relevant Tribespot account), after which they will be able to view/use the same marking interface as you without having to use the main account.
Other features available in the marking interface include:
- Filtering functionality by name and role - the filtered list of applications will be present in the same table on the left-hand column
- Export application data to an excel spreadsheet
- Voting and scoring interfaces - enabling markers to input numerical scores and votes for each application. Both these features can be toggled on or off depending on whether you want them or not.
- Marker comments interface - markers can write and save comments pertaining to each application.

You will also be able to view attachments that candidates might have submitted as part of their application. Pease note that if any attachments appear with a .null extension, please change the extension to .doc or .docx when downloading to successfully view the attachment. Additionally, if you have many attachments that are inconvenient to download one by one, please email [email protected] and we will be able to mass-download for you.
Once you have decided on whether an application will progress or not, select the appropriate verdict from accept or reject (maybe is also available, but will not forward the application to a mailing list), and the application will go onto the relevant mailing list regarding the next steps.
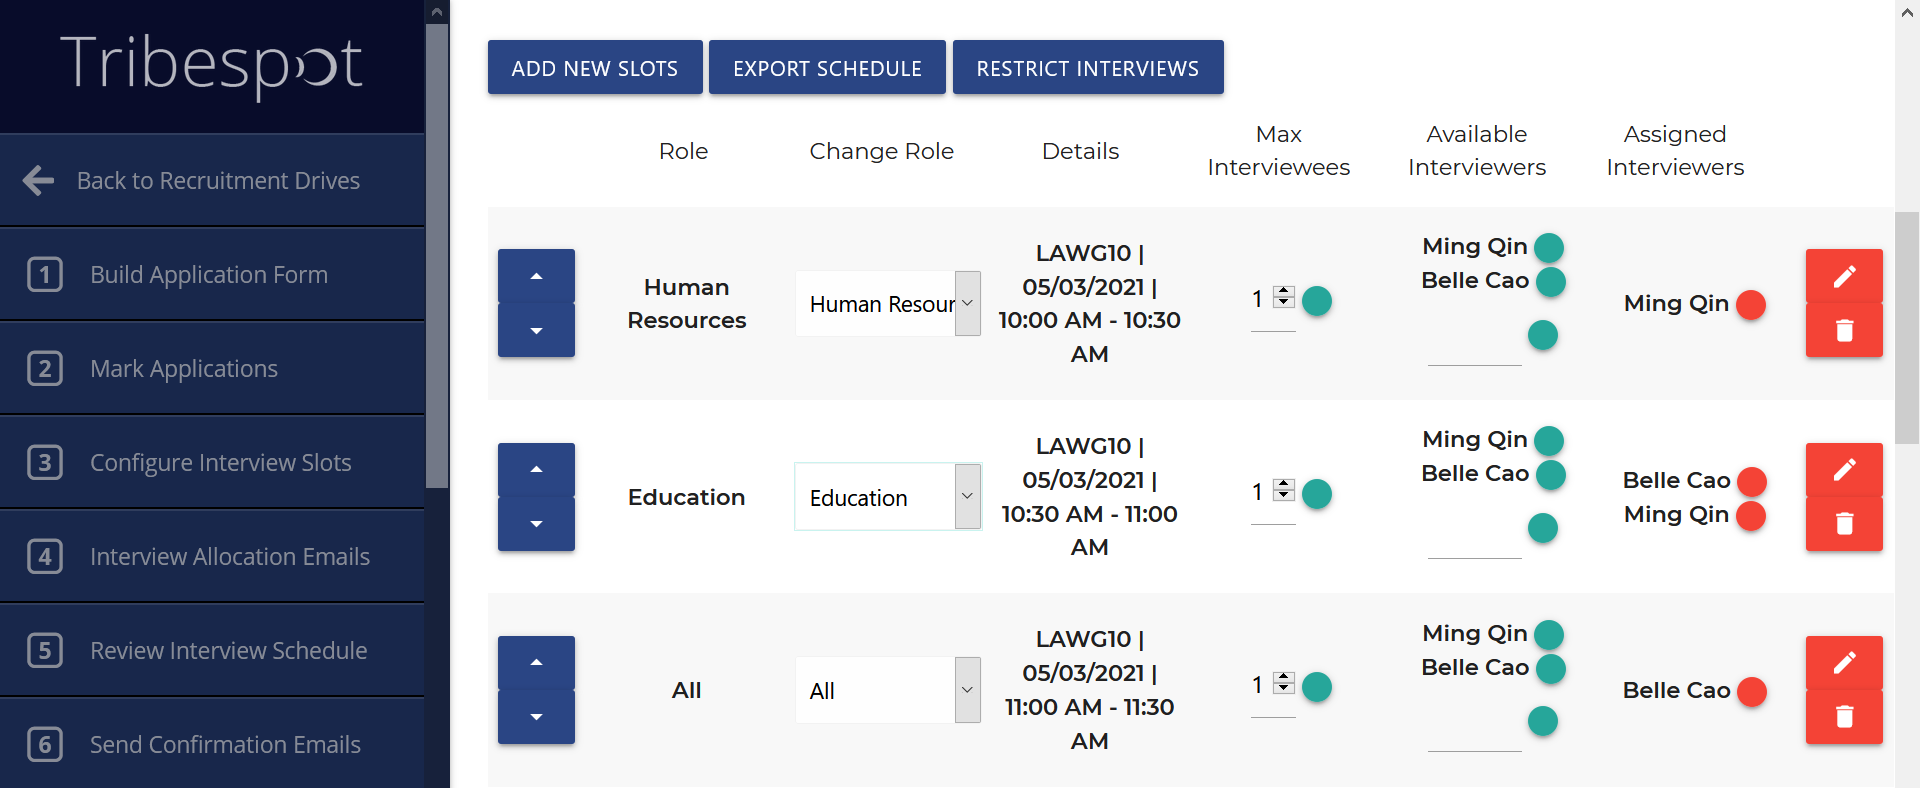
Step 3 - Configure interview slots
In a nutshell, Tribespot organises interviews throughout steps 3-6 as follows:
- You organise a list of interview dates/times (step 3)
- All shortlisted applicants are emailed and prompted to select a time from this list on a first-come-first-serve basis (step 4)
- You are given a chance to review the selections the candidates have made and make changes if you'd like (step 5)
- Shortlisted applicants are emailed again with confirmation of their selected interview times (step 6)
A general overview of how step 3 works is as follows:
- Create a list of interview times using the "Add New Slots" button
- Configure the role that each interview slot will interview for - this is critical as this controls what times will be able to be chosen by specific candidates
- OPTIONAL: Distribute the link to collect interviewer availabilities, where your interviewers can enter (and later edit) their availabilities through our calendar interface
- OPTIONAL: Assign interviewers to interview at speific times (interviewer names will automatically be displayed next to times they are available for)
- OPTIONAL: Configure other details such as maximum number of interviewees in each slot, as well as the restriction of interviews (so specific candidates cannot pick interviews that have specific interviewers present)
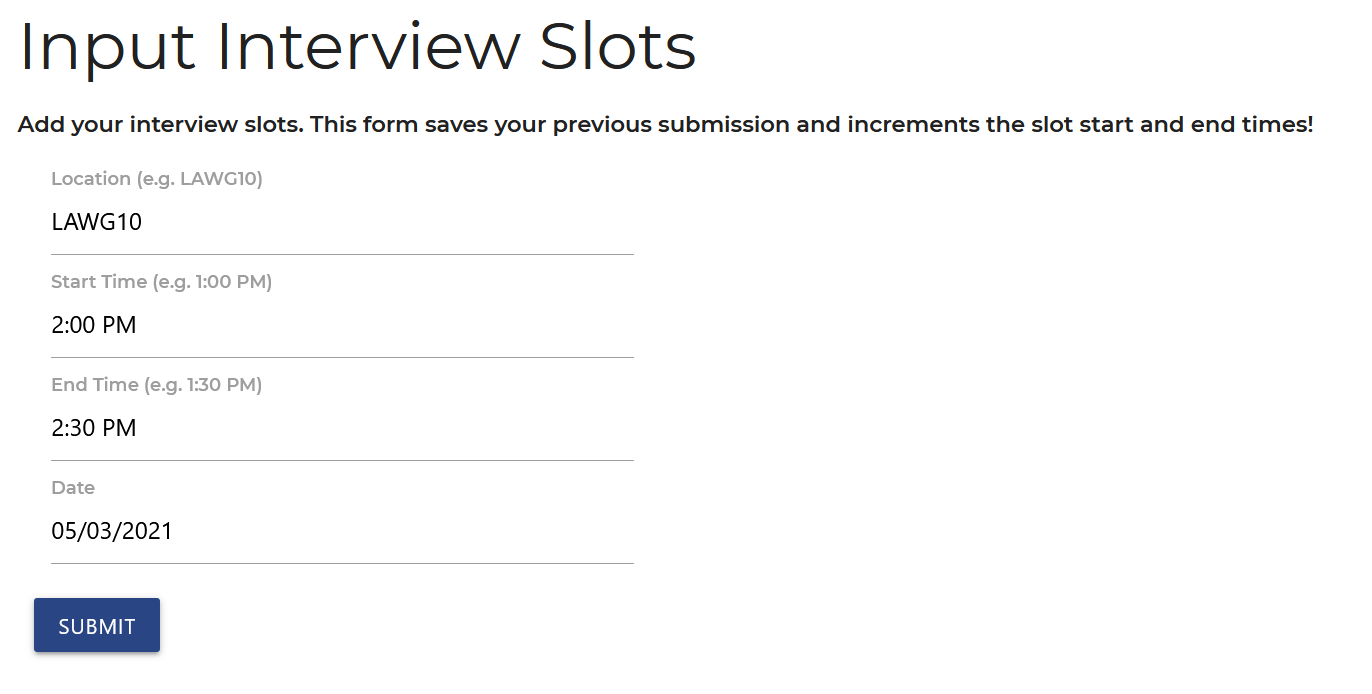
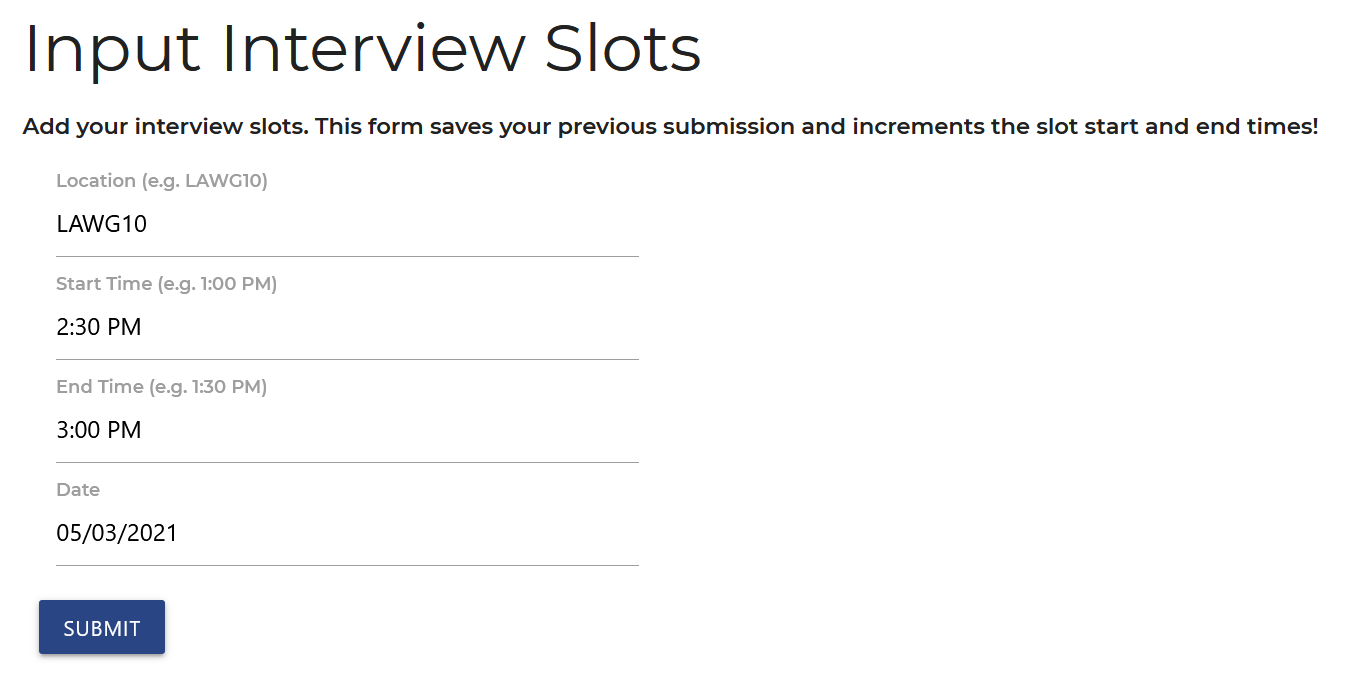
To create an interview slot, click the "Add New Slots" button and enter the date, time and location that the interview will take place. After you have clicked submit, the text in the location and date fields will remain the same, while the start and end times will auto-increment in accordance with the length of the previously submitted interview slot (e.g. submitting an interview slot with start and end times as 2:00 PM and 2:30 PM respectively will result in new start and end times of 2:30 PM and 3:00 PM). This will enable you to create consecutive interview slots quickly in succession without having to manually fill out the fields each time.
Each interview slot created will be visible in the table in Step 3, where you will also have the option to edit a number of features regarding the interview slot such as the maximum number of interivewees to be present in each slot, as well as the location, date and time.
Use the options in the Change Role column to control which roles each slot should interview for - the app will use this as a basis for determining what kind of interview times a candidate will be able to pick (e.g. an applicant who has applied only for IT and Marketing roles will not be able to choose a slot that is marked with only the Human Resources role).
To collect interviewer availabilities, please use the link provided towards the top of the page (generated when you create your application form). Your interviewers will be able to enter their names and availabilities using the calendar interface present in this link.
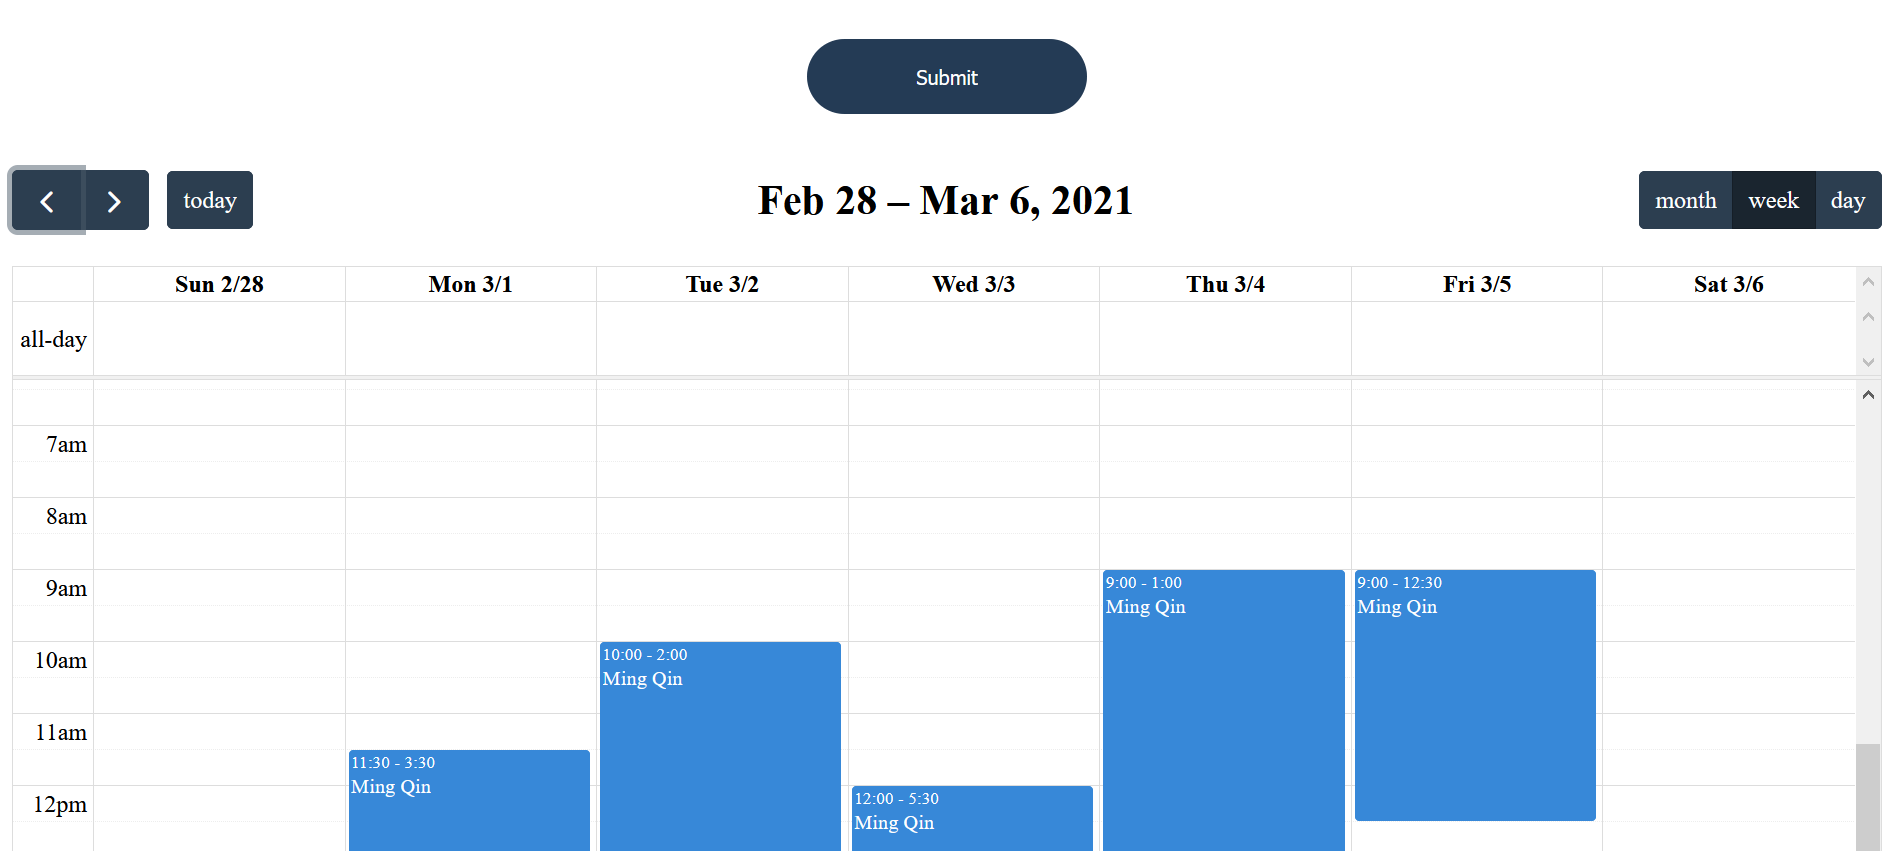
After submitting, their names will be displayed in the aforementioned table under "Available Interviewers" for all interview slots where they will be free to interview. They can then be formally assigned to that slot by clicking the green button next to their name, and removed from the slot by clicking the red button next to their name in the "Assigned Interviewers" column. You are also able to add names manually to the "Available Interviewers" column using the input field towards the bottom of the list.
Step 4 - Interview Allocation Emails
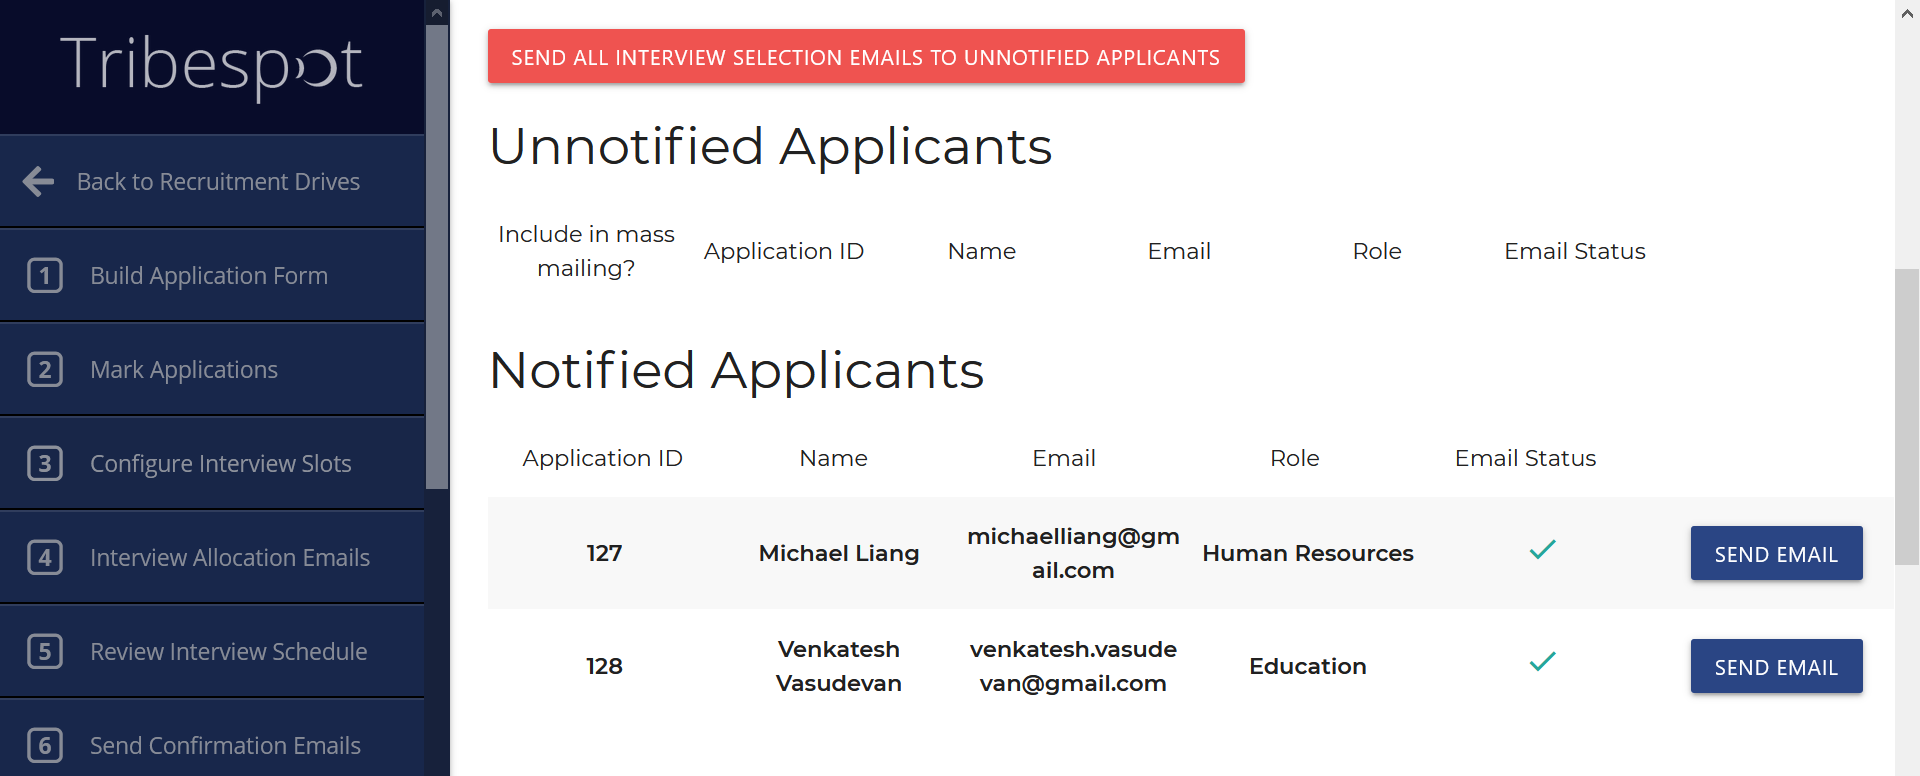
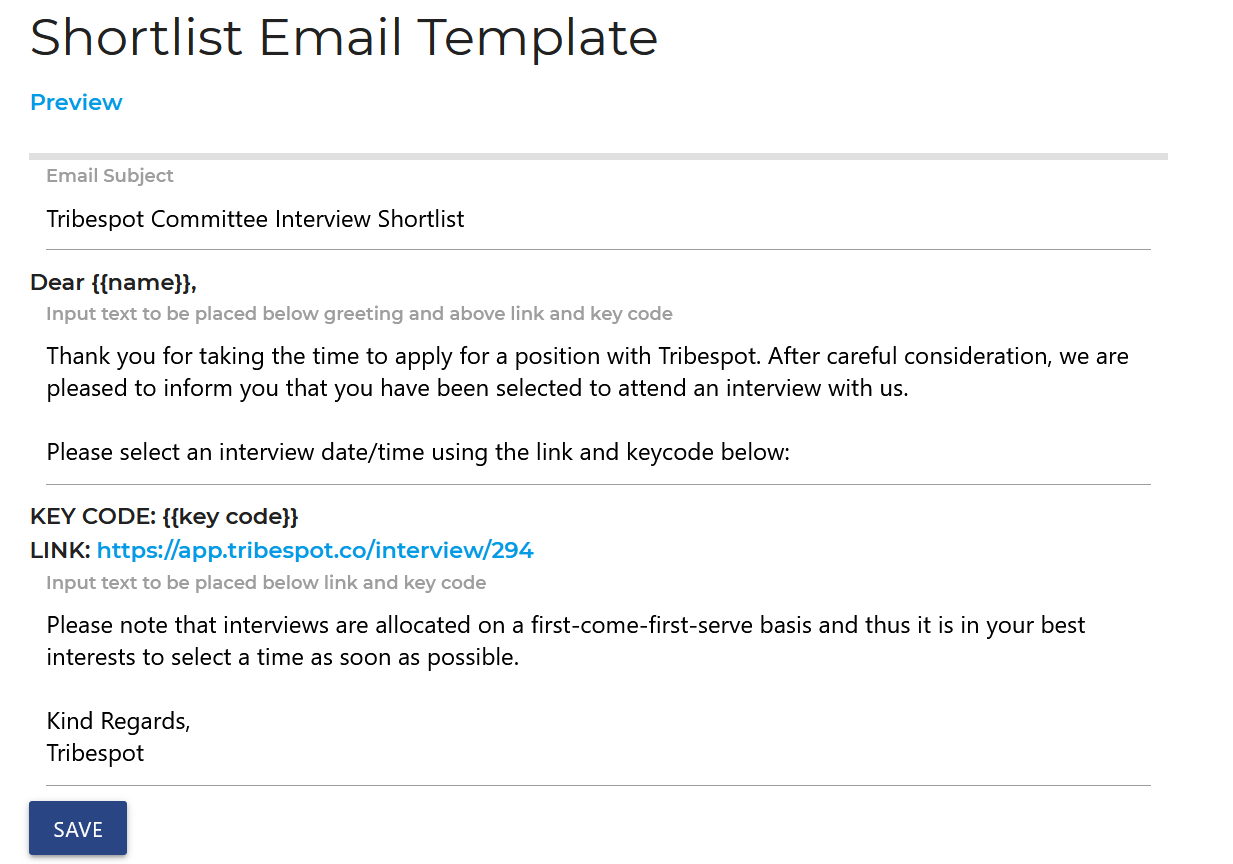
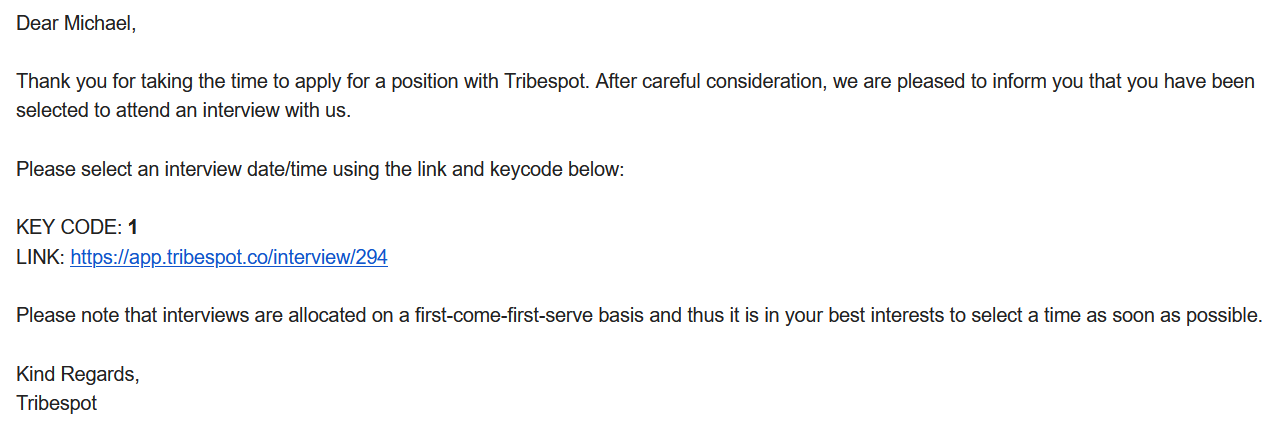
In this step you will send out emails to all shortlisted applicants so that they can select a time to be interviewed. In this email, a link and personalised keycode will be provided through which applicants can select a time. An email template is provided at the bottom of the page - this is largely up to you to write, but a small amount of text containing the link and keycode is set in stone. After creating the email you wish to send you will be able to preview it by clicking the link underneath the Shortlist Email Template heading.
Please note that for recruitment drives that have the multiple interviews setting on, every applicant who has been shortlisted for at least one role will get exactly one email in this step. However, they will only be prompted to select interviews for the roles that they were shortlisted for.
To see what exactly a recipient would be emailed, there is testing functionality at the top of the page, where you can enter an email (likely your own) and that email will be sent the exact email the first applicant in the table would receive. Once you are happy with your customised email, you can click the red button to send the email to all unnotified applicants, or send emails individually using the button in the table. These emails (like all sent within the app) will be visible in the email log that can be accessed through the side nav.
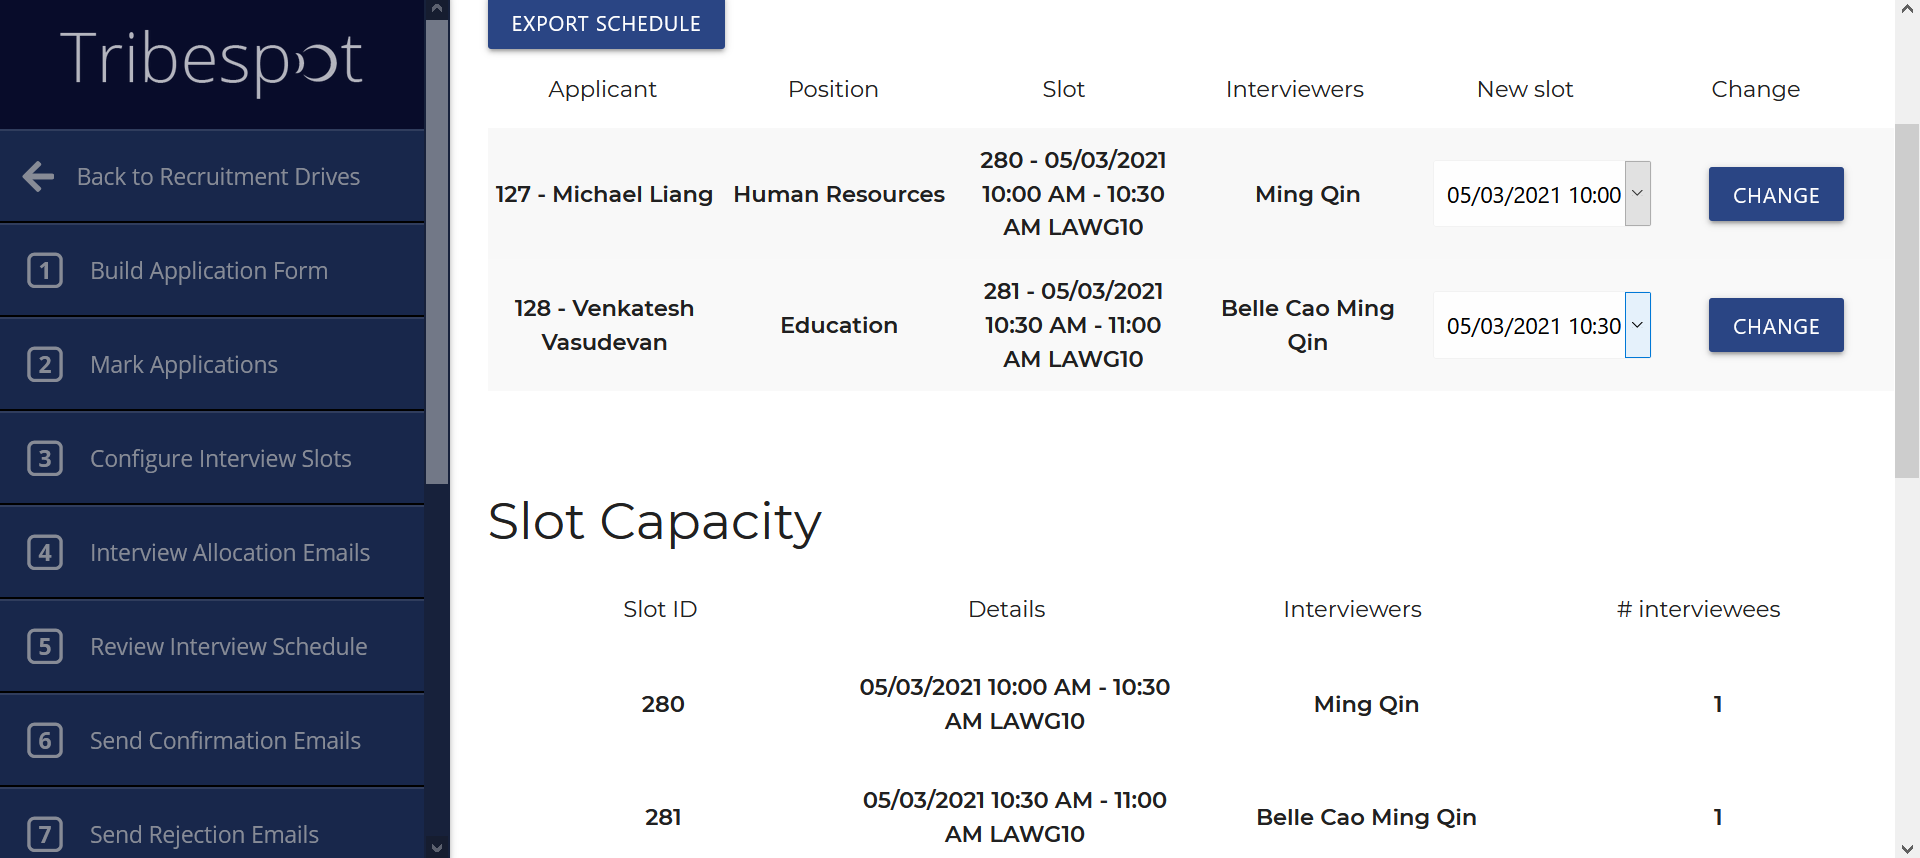
Step 5 - Review Interview Schedule
This step provides an interface to view the timeslots your shortlisted applicants have selected. In the first table you will also be able to change the interview allocated to a candidate if necessary. Additionally, an export schedule button is available to produce a pdf containing a schedule of all interviews.
Step 6 - Send Confirmation Emails
In this step you will send emails to shortlisted applicants as confirmation of their selected interview times. Like Step 4, you are able to customise this email for the most part, but a small amount of text pertaining to the interview's details (shown in the template) is fixed. In the case of drives on the multiple interview setting, one email will be sent per interview.
Step 7 - Send Rejection Emails
Here you will email all people who have not been shortlisted. Note for mutliple interview drives, candidates who are selected for some roles but not shortlisted for others will not receive any rejection email.
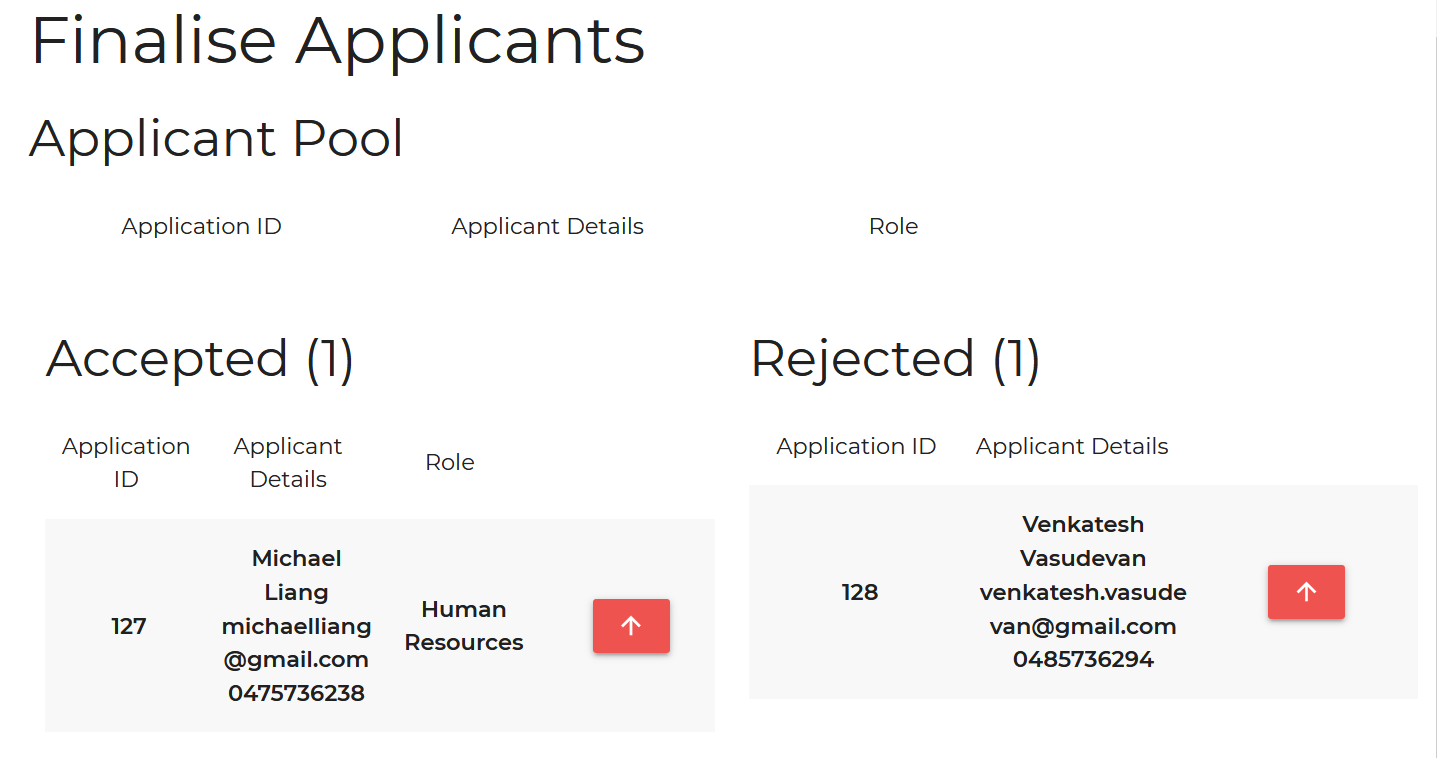
Step 8 - Finalise Applicant Picks
In this step you will make the final verdict on which interviewed candidates will be offered a role. Simply click the thumbs up button to accept a candidate and the thumbs down to reject.

Step 9 - Send Final Offer Emails
Here you will email everyone who will be offered a role. As shown in the template, the role will be included in the email.
Step 10 - Send Final Rejection Emails
Finally, all applicants who did not progress past the interview stage will be emailed here.
Email Log
In the email log you will be able to view a table containing all emails successfully sent from within the app. You will be able to see the exact message sent, as well as the subject.
Drive Settings
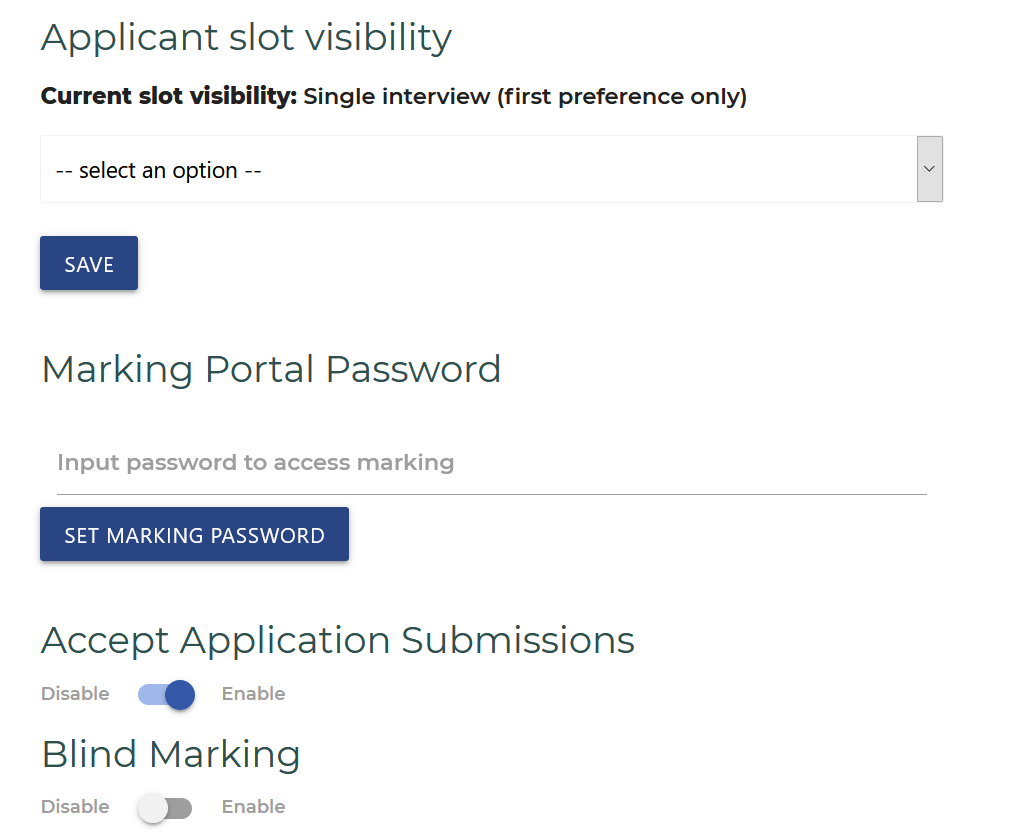
In Drive Settings, several options are provided to customise your recruitment drive:
- Applicant Slot Visibility - change the style of interviews offered in the recruitment drive from the options shown. This can be changed up until shortlisted applicants are emailed in step 4.
- Marking Portal Password - set the password to be used for people to access the external marking link provided in step 2
- Accept Application Submissions - used to disable the application form created in step 1 (usually after deadlines have passed)
- Blind Marking - details such as names and emails in step 2 is removed/replaced. A common use case for this would be to ensure marking is done without any inherent bias.